Elden Ring: Nightreign'deki Tüm Ana Bosslar

The so-called Nightlords are the main bosses in Elden Ring: Nightreign. You and your allies will face them after successfully surviving two full in-game days. Nightlords are the final objective and the primary challenge of each run, so it’s crucial to understand how each one works to plan your strategy. This guide will explain how to defeat every main boss in Elden Ring: Nightreign.
How Main Bosses Work in Nightreign
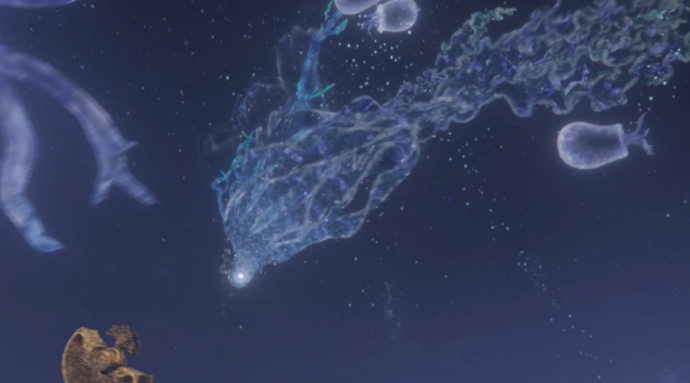
A Nightreign run consists of two in-game days. You drop onto the map, fight enemies, and loot locations. Each day lasts around 15 minutes, after which night falls, and that's when you’re forced to fight a mandatory boss. Defeating this first boss marks the end of Day 1, and the battle royale-style map shrink is reversed, giving you space to begin Day 2. At the end of the second day, another boss appears. Once defeated, a massive jelly-like mass appears in the world, passing through it takes you to the In-Between, where you can unlock the path to the Nightlord. This is your final showdown.
Nightreign: All Main Bosses List
It's still worth surviving to get to the bosses. Here's our overview of all the classes in Nightreign as complete text. So you know who to pick and how to play.
Nightlords are the ultimate objective in Nightreign. Beating one means your run was successful. There are eight different Nightlords in total, and each one counts as a main boss in Elden Ring: Nightreign. Since losing to either of the two earlier bosses or the final Nightlord can end your run, choosing which Nightlord to face before the match begins is a crucial part of your team’s overall strategy.

Gladius
This massive three-headed red wolf fights like a storm. At mid-health, he splits into three separate wolves, each faster and deadlier than before. His attacks combine long-range fire breath, whip-sword slashes, and aggressive lunge combos. The key here is control: have a tank like Guardian soak the aggro while classes like Recluse or Duchess strike from the sides. If you try to face Gladius head-on alone, you’re toast.
Attack | Description |
Heavy Lunge | Stands up and lunges forward, sometimes chaining it. Dodge into and punish. |
Quick Bite | Fast forward bite. Block or dodge backward. |
Jumping Bite Dash | Jumps back, then immediately dashes to bite. Time your dodge carefully. |
Straight Sword Slam | Raises sword and slams in a line. Sidestep to avoid. |
360º Sword Spin (x2) | Stands still, raises sword, spins twice in full circles. Double-dodge to escape. |
Fire Breath | Glows lava-red, breathes fire in a wide arc. Sprint sideways to avoid damage. |
Gladius splits into three individual wolves once his HP drops low — this is the hardest part. Each wolf hits fast and won’t stay still. Keep moving, don’t overextend, and wait for the merge to reposition and heal.
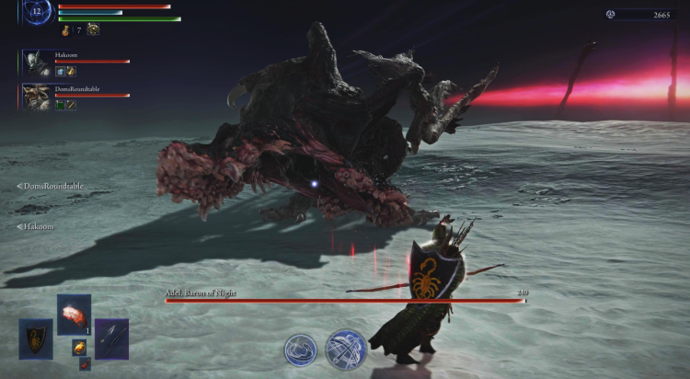
Adel
Adel, Baron of Knight, is one of the more chaotic Nightlords in Elden Ring: Nightreign, and he’s all about pressure. This malformed drake comes with a rotating jaw and an unpredictable aggro system — he’ll attack whoever strikes him, even mid-animation. Most of Adel’s offence is mouth-based, including wide sweeps and devastating slam attacks, but he can also float using gravity magic and cast explosive AoEs. Poison is his only known weakness, and getting too close for too long is always a gamble. It’s all about timing and coordination: bait his focus, spread out, and don’t get greedy.
Attack | Description |
Jaw Drag | Drags open jaws across the ground, wide horizontal sweep. |
Jaw Slam | Lifts head and slams straight down, often chained in rage mode. |
Grab Attack | Tries to chomp and hold a player, causes rapid Blood Loss. |
Enraged Lunge Combo (Phase 1) | At 75%, gains speed and chains lunges/dashes. Harder to punish. |
Gravitational Roar (Phase 2) | AoE stomp that triggers radial gravity burst. Stay back when HP <50%. |
Divebomb | Flies briefly then slams down, exploding the ground after delay. |
Mist Cloak | Covers the arena in black mist. Lures players into ambushes. |
Lightning Jaw Slam | In Phase 2, jaw slams trigger lightning bolts around impact zones. |
Adel enters rage states at both 75% and 50% HP, chaining faster, harder-to-dodge combos. He’ll dive, vanish in mist, and strike with AoE lightning — so don’t let your guard down, and always lure him into the open.

Sentient Pest
The Sentient Pest is one of the most disruptive Nightlords in Elden Ring: Nightreign, known for its ability to invade players mid-run. It appears as either a massive moth or a giant beetle, and can show up unexpectedly to derail your progress. When it invades, it sends out smaller pests that siphon away your levels—literally draining your stats and reducing your damage and health. You'll need to track these pests back to the boss itself to reclaim your stolen power. Though the encounter isn’t particularly brutal, it punishes unprepared players with long-term debuffs if ignored.
Attack | Description |
Poison Mist | As the Moth, sprays a cone of toxic fog. Causes gradual poison buildup. |
Locust Swarm | Summons flying pests that latch onto players and steal levels. |
Level Drain | Passive effect during invasion. Lowers player stats until the boss is defeated. |
Dodge-Resistant Swarms | Flocks of insects track players even through evasive movement. |
Intelligence Integration (Reward) | Restores stolen levels, gives bonus runes on hit via passive effect. |
Once defeated, Sentient Pest returns all lost levels and unlocks the Integration of Intelligence power—an excellent passive that occasionally grants runes on attacks. Worth hunting early if you’re aiming to snowball.
Maris
This slippery aerial boss specialises in field control, sleep auras, and battlefield traps. Most of its attacks come from above, either in the form of jellyfish swarms or water-based wave attacks. Melee characters will have a rough time getting in range, so ranged-focused builds like Ironeye or the Recluse are recommended. Lightning weapons work wel,l but aren’t mandatory. Survive long enough, and you’ll be rewarded with a Trace of Night and the “Night of the Fathom” boss relic.
Attack | Description |
Jellyfish Swarm | Releases floating jellyfish that drift and explode. Easy to outrun, dangerous up close. |
Water Wave | Large AoE water attack that bounces once. Watch the buildup animation. |
Spin Strike | Maris spins in place hitting nearby targets. Just back off. |
Charge | Gathers air and rushes forward, damaging everything in its path. Dodge sideways. |
Tentacle Trap | Spawns stationary tentacles that lash out. Avoid or clear small safe areas. |
Sleep Aura | When lying on its back, releases a sleep field. Use Ultimate to avoid effects. |
Teardrop Bomb (Ultimate) | Drops two massive bombs from the sky. Must destroy mid-air or suffer huge AoE + sleep. |
Maris enters Phase 2 at half health: more jellyfish, more tentacles, and more frequent charges. Its ultimate teardrop attack can instantly end your run if not intercepted—keep your eyes up and save your best DPS for the skies.
Libra
Libra, the Equilibrious Beast, is one of the most conceptually unique Nightlord bosses in Elden Ring: Nightreign. Before the battle starts, players must choose from a set of cryptic offers, each of which alters their character in a significant way. Whether you wish to boost your Intelligence at the cost of a level, gain three levels with the caveat that flasks remove one each time, or trade a bit of your maximum health for a one-time resurrection, every deal has its benefits and consequences.
Deal | Effect |
I wish to expand my intellect | Respecs stats to boost Intelligence, but costs 1 level. |
I want resistance to ailment | |
I want to hold death at bay | Fully restores HP once when low, but lowers max HP. |
I wish to have great dexterity | |
I wish for eventual greatness | |
I want to fight at utmost strength | |
I want to gain many levels | Gain 3 levels, but each flask use removes one. Risk-reward gamble. |
I desire a powerful weapon | Receive a strong weapon, but lose 1 level. |
I refuse to make a deal | Fight Libra without any stat changes. |
Regular Phase. Once the battle begins, Libra floods the arena with magical orbs that explode on contact with the ground and deadly sigils that detonate after a short delay. The staff strikes are heavily delayed, which throws off the timing of dodges, and Frenzy buildup constantly threatens to spiral out of control if players stop moving. The key to surviving this early phase is to maintain motion and avoid clustered areas, using the golden crystals left behind by Libra’s attacks to purge Frenzy buildup whenever possible. These crystals become a kind of secondary resource—movement keeps you alive, and collecting these keeps you sane.
Channelling State. At about half health, Libra enters the Channelling state, floating in the air behind a golden shield while sigils appear across the arena. If players can destroy all the sigils in time, Libra descends into the Furious phase—a chaotic blitz of physical attacks with no magic. Fail to destroy the sigils, however, and Libra instead enters the Golden phase, where it becomes tankier and all of its magic becomes far more intense: sigils shoot projectiles in every direction, appear more frequently, and remain active longer. Orbs swarm the space, and staff attacks become delayed chain hits.
Furious Phase. In this phase, Libra foregoes magic and relies solely on physical attacks. It charges, leaps, and slams its massive body into players with relentless speed. The absence of magic makes it slightly easier to predict, but the intensity of the physical combos demands precise timing. Running away and only attacking between combos is the safest way to survive.
Golden Phase. This is the most challenging phase. Libra covers itself in golden armour that boosts damage reduction while flooding the arena with magic sigils and orbs. Sigils linger longer and release projectiles in all directions, and the staff’s delayed attacks become more punishing. Managing Frenzy buildup here is critical—players must balance dodging, attacking, and collecting golden crystals to survive until the end. The phase culminates in Libra slamming its staff into the ground, causing a massive Frenzy buildup pulse that forces players to stay mobile or risk instant death.
Libra’s battle tests not only your combat skills but also your adaptability and decision-making, making it one of the most layered encounters in Elden Ring: Nightreign.
Darkdrift Knight
Known for his high mobility and spear-based combat style, Fulghor challenges players with a mix of melee and ranged attacks that keep the fight dynamic and unpredictable. His towering presence and constant movement make him a difficult target to pin down, and his vulnerability to Lightning damage encourages players to prepare their loadouts accordingly. Completing this expedition rewards players with a valuable Trace of Night, a key item needed to confront the final boss, along with the coveted Night of the Champion Boss Relic and other randomised loot.
Attack/Feature | Description |
Spear melee swings | Fulghor swings his spear in close combat, with some attacks hitting high and difficult to block. |
Ground slam with fissures | When jumping or rearing, he slams the ground, causing damaging fissures around him. |
Spear slam with magic burst | A charged spear slam that causes magic spears to erupt from the ground. |
Magic seals explosion | After the spear slam, magical seals appear and explode after a delay, requiring careful dodging. |
Stagger mechanic | Strong attacks can interrupt the spear slam, leading to a stagger and alternate attacks. |
Stampede charge attack | Fulghor charges across the arena leaving a damaging magic field and follows with a magic stomp. |
Wind-charged spear throws | From a distance, he charges and throws his spear in wind bursts that must be rolled through. |
Phase two arm slam and combos | Gains a twisted arm with area blasts and erratic combo attacks that leave damaging residue. |
When preparing for the fight, having a ranged character on the team is highly recommended due to Fulghor’s mobility and constant movement, which make melee engagement tricky. Shield users must be cautious as many of Fulghor’s attacks strike high, rendering blocks ineffective and encouraging rolls instead. Solo players will find Raider particularly effective, thanks to his Retaliate skill that punishes Fulghor’s aggressive melee combos with frequent staggers. Throughout the fight, players need to stay alert for Fulghor’s spear slam and the magical seals it spawns, dodging carefully to avoid heavy damage.
In the second phase, his twisted arm introduces unpredictable combo attacks with wide ranges and residual damage, forcing players to prioritize positioning behind him or rely on timely shields and dodges. Mastering these tactics and timing counterattacks will pave the way to victory and the valuable rewards Fulghor guards.
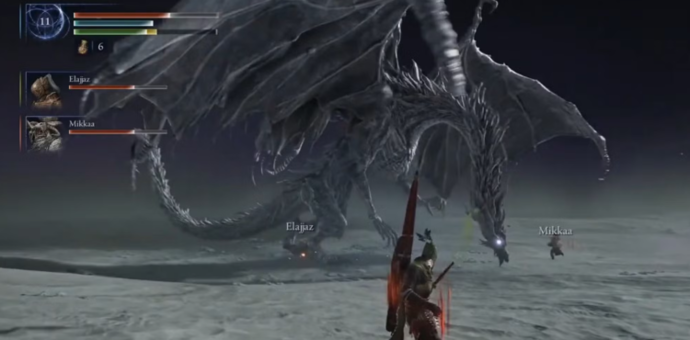
Caligo
Caligo, Miasma of Night, also known as Fissure in the Fog, is a massive ghostly dragon and one of the Night Lords in Elden Ring Nightreign. This prehistoric beast is said to dwell in dense fog, appearing as an omen of doom. Caligo’s combat revolves around powerful Ice sorceries and physical attacks, including a freezing breath and tail whip that keep players on their toes. Despite its enormous size, Caligo moves with surprising agility, sliding across the battlefield to close distance and strike with claws or breath, making positioning and timing essential for survival.
Attack/Feature | Description |
Freezing breath | Wide-area ice breath attack that rotates, safest to stay directly beneath the dragon. |
Tail whip | Quick lash attack that strikes players behind or beside the dragon. |
Agile movement | Slides across the battlefield with lunges and claw strikes to quickly engage players. |
Dense mist/fog | Covers the arena in thick fog, obscuring vision and requiring players to rely on audio cues. |
Falling ice shards | After fog appears, ice falls from the ceiling, damaging all players except those below Caligo. |
Flying freezing mist | In phase two, Caligo spits freezing mist from the air, extending his ranged threat. |
Ice meteors | Calls down ice meteors that deal area damage and leave lingering ice shards on the ground. |
Devastating wind attack | In the second phase, Caligo envelops the arena in dense mist and unleashes a powerful wind attack requiring players to find cover. |
In the first phase, Caligo mainly uses his freezing breath and tail whip, relying on quick lunges and claw attacks to pressure players. The dense fog that sometimes blankets the arena creates a challenging environment where visibility drops drastically, forcing players to listen carefully for audio cues to locate the boss and avoid deadly falling ice.
When the fight transitions to the second phase, Caligo takes to the skies, adding aerial freezing mist attacks and ice meteors that further complicate movement and evasion. The chilling wind attack is particularly dangerous, as it forces players to coordinate and seek cover behind rocks, turning the battle into a tense game of timing and positioning. Mastery over these mechanics will be key to overcoming the miasma-shrouded dragon and emerging victorious.

Night Aspect
Heolstor the Nightlord is one of the toughest bosses in Elden Ring Nightreign, featuring two phases with distinct weapons and attack patterns. He starts slow and one-armed, then shifts to a dual-armed form wielding a Moonlight Greatsword before switching to a fiery greatsword. His weaknesses to Holy and Lightning make those the best damage types to focus on, while Fire can be risky due to his weapon changes. Team synergy and careful dodging are key to beating him.
Attack | Description |
Lunge | Side slide and jab lunge attack |
Roar | Stuns nearby players, then dashes with 3 sword swings |
Dash | Fast dash and sword swing |
Magical Lunge | Sword lunge with AoE explosion, then ground stab with another explosion |
Crescent Arcs | Throws crescent moon magic blasts, then a vortex lunge |
Improved Dash | Dash, swing, overhead attack, delayed dash |
Shrouded In Darkness | Arena darkens with damaging magical darts swirling |
Sky Rend | Flies up, rips sky, crashes causing arena eruptions; switches to fire sword |
Smouldering Blade | Sword attacks create fiery geysers |
Flaming Lunge | Triple swings followed by lunge causing erupting ground |
Fiery Slash | Rapid swings with flaming streaks |
Eruption | Jumps, charges, crashes causing area eruption, then reverts to Moonlight |
Despite the impressive visuals and intense moves, Heolstor’s attacks allow for mistakes if you stay calm and coordinate. Sharing aggro among teammates helps manage his pressure and gives you openings to land hits and survive this punishing Nightlord.
Defeating Nightreign Main Bosses: Tips
When facing Elden Ring Nightreign bosses, the single best tip is to master your timing on dodges and learn each boss’s tells before committing to attacks.
Many bosses have powerful but telegraphed moves with clear wind-ups. If you wait just a fraction longer before dodging, you’ll avoid damage consistently and open safer windows to strike.
Avoid spamming attacks; instead, focus on patience and observation. Additionally, bring a balanced team with a tanky player to hold aggro and a ranged damage dealer who can punish from a safe distance. Using status effects the boss is weak to—like Holy or Lightning against Heolstor—will tip the scales heavily in your favour. Lastly, never underestimate the power of rolling towards attacks rather than away—it often places you in a better position to counterattack quickly.

Vitalii Diakiv, en son duyurulara ve pop-kültürel fenomenlerle eşleşen oyunlara odaklanan oyun blogları ve rehberleri yazıyor. İkinci olarak, Counter-Strike 2, Marvel Rivals, League of Legends ve diğer e-spor etkinliklerini ele alıyor.
Vitalii, Fortnite, CS2, Marvel Rivals ve LoL'e odaklanarak derinlemesine oyun haberleri ve e-spor kapsamı sunuyor. Oyun seçim listelerini düzenliyor ve okuyucularıyla birlikte yeni ayrıntıları ortaya çıkarıyor. Haber yazarken merakını uyandıran konuları arıyor; blog editörlüğünde kendi bakış açısıyla kişisel bir dokunuş getiriyor.


 Dota 2 ESL One Birmingham 2026 İncelemesiESL One Birmingham 2026 İncelemesi: Tundra Esports'un Zaferi, Ödül Dağılımı ve Turnuvanın En Heyecan Verici Anları.
 Slay The Spire 2: Her Karakter İçin En İyi Oyun StratejisiSlay the Spire 2'nin beş karakterinin her biri, mevcut erken erişimdeki diğer tüm arketip türlerinden daha iyi performans gösteren baskın bir yapıya sahip.
 ESL One Birmingham 2026 Büyük Final Sonuçları: Tundra Şampiyon OlduTundra Esports, ESL One Birmingham 2026 Büyük Finalinde Team Y'yi 3-1'lik skorla mağlup etti. Kendinden emin bir performans, maçın detaylı analizi ve final sıralaması içeride.
 ESL One Birmingham 2026: Alt Tur Finali Özeti — Büyük Finali KaçırmayınY Takımı, ESL One Birmingham 2026 Alt Tur Finalinde Xtreme Gaming'i 2-1 yenerek Büyük Finalde Tundra Esports ile karşılaşmaya hak kazandı.